Posts from the ‘Lake District’ category

Lake District – A new gallery page

In February 2013 I stayed in The Lake District for a few days in the company of Paul Gallagher, a very well renowned black and white UK photographer. I spent three days in the field, followed by a fourth day in his studio learning post processing and printing techniques.

We were fortunate with the weather given the time of year. It was cold but dry and there were some snow capped mountains, not to mention of course the beautiful lakes themselves.


I have just added a new gallery of Lake District images to this website. In this entry there are a few photographs which were taken on this trip but I hope you will click on the link below to view the full gallery.

Lake District Gallery Page.


Here are some links to some older entries which relate to my time in The Lake District.

Lake District 121 with Paul Gallagher

Lake District 121 – camera technique at Wasdale Head 

Lake District 121 – using filters

Lake District 121 – Post Processing

Lake District 121 – pre-visualisation and post processing techniques

I will lift up mine eyes unto the hills….

Do click on any of the images in this post to view a larger version in a new window.

Or click here for the Lake District Gallery Page.

Another year over……

It’s the last day of 2013 and tomorrow it will be 2014.

Another year over….. a new one about to begin.

20131231-_C310075-Edit.jpg

Inevitably it’s at this time of year when we all reflect on what has happened in the past 12 months and start to look forward to what we might hope to do and achieve in the next 12 months. From a purely personal point of view 2013 will never be forgotten and I have already been mentioned the reasons why in an earlier entry called ‘Three Crosses’.

On a happier note in September I realised a long held personal ambition and walked the South Downs Way with my nephew from Winchester to Eastbourne – a total of 100 miles. This was never intended to be a photographic expedition, but the camera came out on a regular basis so I was able to capture the beauty of this part of the world.

Seven Sisters
The Seven Sisters
The ‘home’ straight of The South Downs Way
 

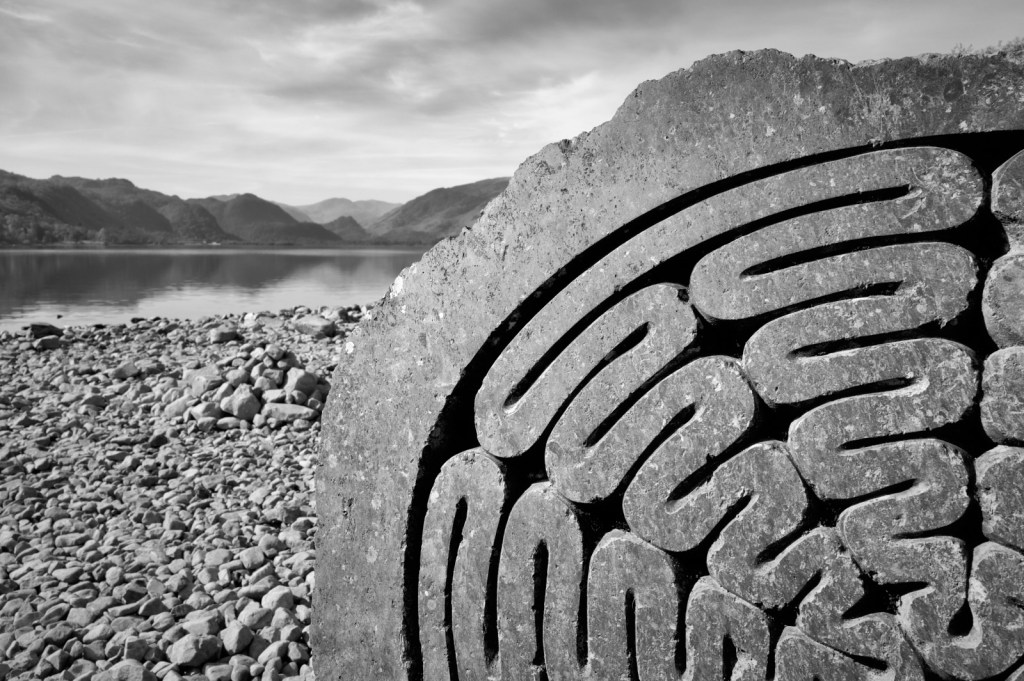
I do not think that I have spent as much time developing my photography this year as perhaps I would have wished but I do believe my work has continued to improve. I certainly learnt some new techniques and skills when I spent a few days in the Lake District in the company of Paul Gallagher and many of the images made during this time have given me a great deal of pleasure.

Wastwater Rocks
Wastwater in The Lake District

If my Flickr stats are anything to go by I have certainly continued to take a good number of images and in the process I have endeavoured to take a more creative approach, a trend which I am sure will continue into 2014. Almost without exception all of my photographs this past year have been in monochrome. I expect this will also be the case next year, but who knows, colour may start to feature.

And so to 2014. In the last few weeks I have been giving some time and thought to what I would like to do phtographically in the next 365 days, so here goes!

1. More photographs and less ‘GAS’! (Gear Addiction Syndrome – to the uninitiated)

I have to admit that I spend a lot of time reading reviews about the latest camera equipment, particularly cameras, their makers lenses and the pros and cons of one system over another. It’s all very interesting and I have found that the internet is full of very opinionated people which makes for good reading. On the downside ‘GAS’ can be very expensive and as I have often said in the past, it is the photographer who makes the image, not the equipment.

A famous quote by Ansel Adams reads – “The most important component of the camera is twelve inches behind it.” Enough said!

I am fortunate to have some excellent equipment so I shall be using what I have and try not to fantasise about what I don’t have. It wastes time which could be better spent taking more photographs, improving my processing techniques or studying the work of more talented photographers. This research into other cameras and lenses has though helped me decide on my system of choice for the future which brings me on nicely to my second point.

2. It’s time to ditch the Nikon gear

In the past year I have been using two camera systems but during this time I have found that only one system really works for me and the other frankly does not.

When I first became serious about photography I started using a Nikon APSC DSLR and various lenses, but since buying the Olympus OMD EM5 some 18 months ago, together with some truly excellent lenses for the Micro 4/3rds system, the Nikon gear has been gathering dust. So after much deliberation it’s time to say good bye to Nikon.  All of the equipment has been packed away in their original boxes ready for sale. In its place I will be investing in the new Olympus OMD EM1, the first truly professional specified camera for Micro 4/3rds. I will probably also add a couple of prime lenses to my collection and keep the EM5 as a spare body. Luckily these two cameras share the same battery which is an advantage.

20131025-PA251646.jpg
The Olympus OMD EM5, and Olympus 17mm f1.8
My system of choice for 2014
3. Work on a project

Since achieving my LRPS Distinction in December 2012 I have been saying to myself that I must start to concentrate on a specific genre of photography and quite probably a specific subject or theme. It did not happen in 2013 but I plan to change that in 2014. I believe this approach will both hone and enhance my skills and in time provide me with a portfolio which I might want to consider as an appropriate panel of work for an ARPS submission. This plan also leads me to my next point.

4. To publish a book

This sounds rather grand but in truth you can ‘self publish’ a photo book pretty easily these days using one of many online publishing companies. I have already considered two possible suppliers – Blurb and Bob Books. I have downloaded their software which is required to design the book. I shall compare these and others before making a final decision as to which to use, taking into consideration, possible book sizes, paper, quality of reproduction, the software itself and of course the cost. I may even decide on a couple to ‘test runs’ with both companies of the same series of images to see which I prefer.

5. And talking of publications

There are many photographic magazines and to date I have never submitted any work for publication, so this has to be on my wish list for 2014. If it were to happen then yes of course the publicity would be great  but my incentive is a very simple one – an acknowledgement that my work is considered good enough to appear in a magazine. Now that would be fun!

6. Visit more locations specifically to take photographs

I do find that being an enthusiastic amateur photographer requires both time and concentration. This can best be achieved when I am on my own as this gives me the chance to really think about what I am doing. Photography is also about expressing your feelings through a finished image. To accomplish this aim I believe you have to be able to recognise how you feel at the time of taking the shot – again, I can’t see how this can happen if you are not alone. This sounds very selfish but I am sure other photographers, artists or authors would all say the same thing. All of which makes me think that to improve my photography not only do I need to devote more time but I also need to be in a place on my own without any distractions – just me, my camera and the subject in front of me. Where and when shall I go?  Well that I don’t know but I am looking forward to coming up with some answers.

7. Take inspiration from other artists

This is not really an objective, but a recognition that there is so much to learn from other artists not just other photographers. Going to exhibitions or galleries, reading books or watching television programmes about other artists are all good sources of inspiration.

At Christmas I was fortunate to have been given three books which I know will inspire me in the future. I was given two ‘self published’ books by the Welsh photographer Chris Tancock, one called Beating the Bounds, the other named Wildwood. He calls himself a ‘rural documentary photographer’ not a landscape photographer. If you look at his images on his website I think you will understand why.

20131230-_C300067.jpg

Another person who’s work I greatly admire is Norman Ackroyd CBE RA. As a landscape artist and printmaker he captures the meeting of the land and the sea in atmospheric aquatint. His book ‘A Line Above the Water’ is a wonderful collection of his work coupled with evocative poems by Douglas Dunn.

20131230-_C300060.jpg

I can now draw this post to a close. My summary of the year was short but complete and my ambitions for 2014 have been listed. In twelve months time I will know whether or not the wish list was too long, I doubt it is too short!

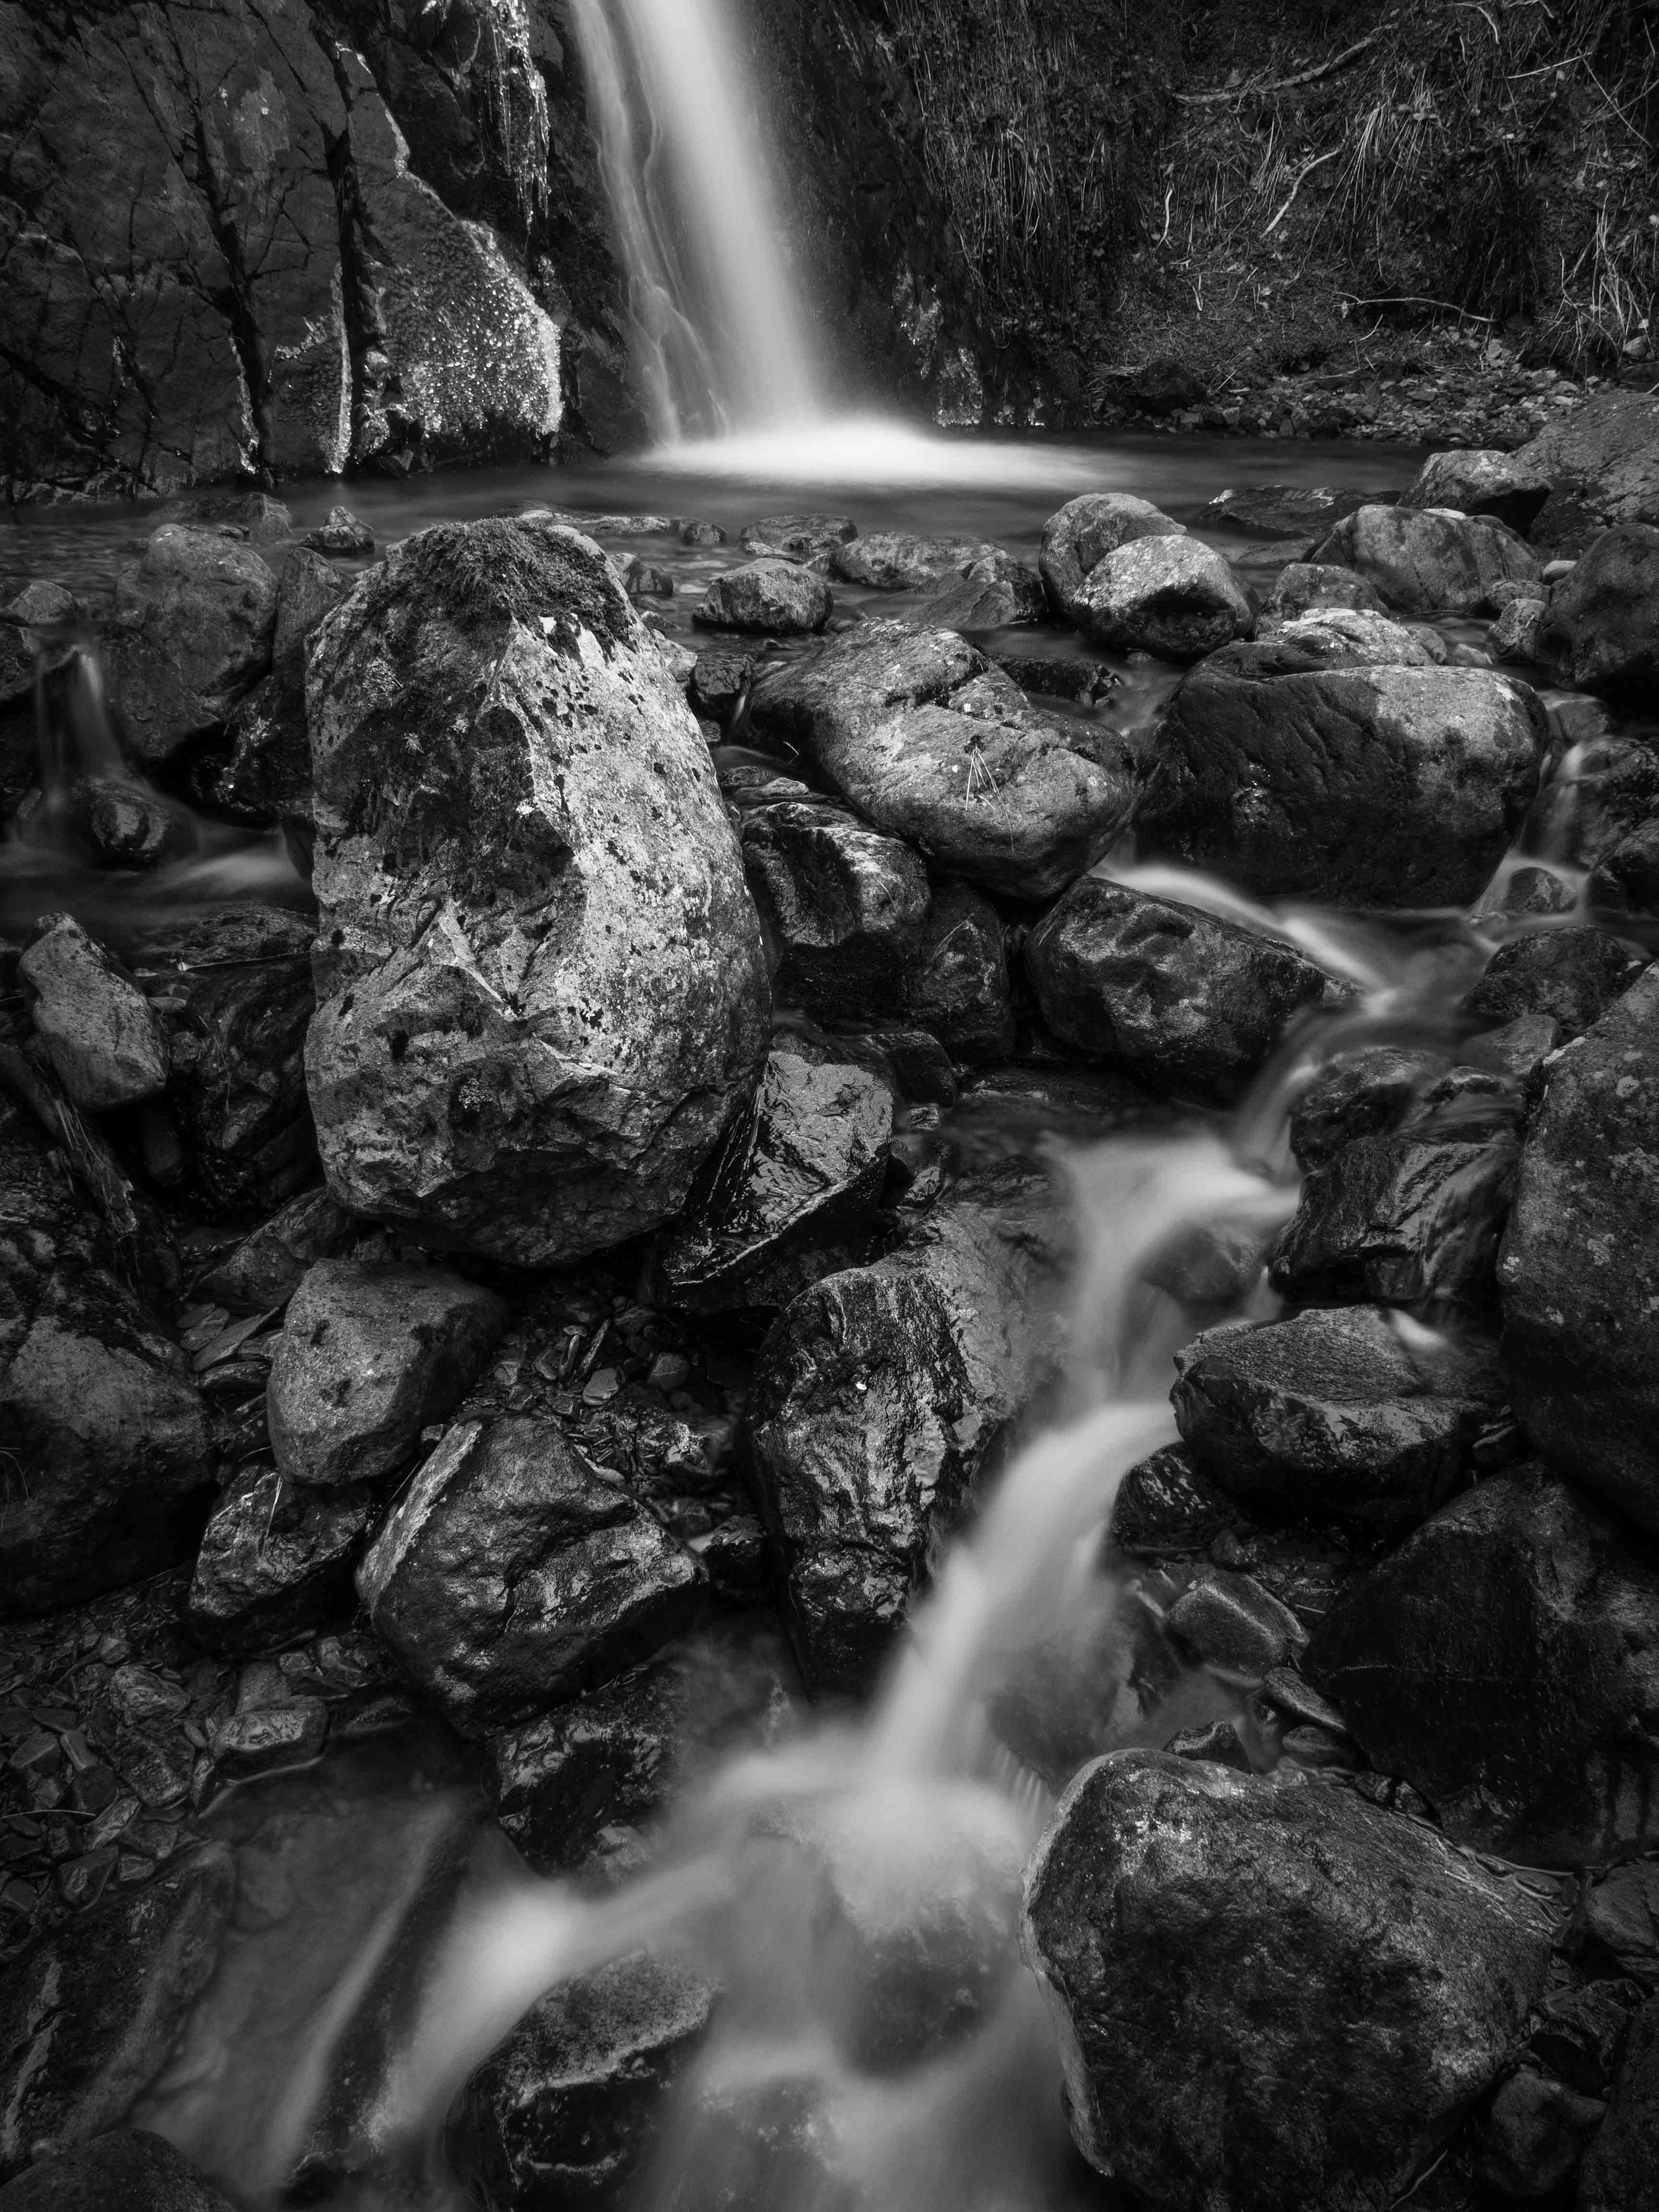
And finally my favourite image from 2013 is –

Buttermere
‘Solace’
Buttermere in The Lake District

May I wish everyone who reads my blog a very happy, peaceful and healthy New Year.

I will lift up mine eyes unto the hills….

St Olaf Church is situated in Wasdale Head, a tiny hamlet at the northern end of Wastwater in The Lake District. A wild and remote place, it is surrounded by hills and mountains including Scafell Pike, the highest mountain in England.

In one of the leaded light windows of the Church there is an inscription and etching of Napes Needle on Great Gable. The words are from the first verse of Psalm 121, and for various reasons this Psalm holds a special place in my heart.

Inscription and etching in St Olaf Church, Wasdale Head

I first visited Wasdale Head and this Church thirty years ago. It was on the occasion of our first family holiday following the death of my father from Motor Neurone Disease in 1983.

Twenty two years ago I returned with my future wife. It was during our stay in The Lake District that I proposed and we married a year later. Again we made a point of visiting this Church and we bought a postcard of the window and the inscription. To this day this postcard still hangs on the wall of our cloakroom with other mementos of our visit.

Just three years ago my mother passed away and I read Psalm 121 at her funeral service.

Today we celebrated and gave thanks for the life of my sister who died at the end of March from cancer. She was just 59 years of age. Again I read Psalm 121.

I know this particular post is very personal and poignant and arguably has little to do with photography.  To the contrary, my visit to the Lake District thirty years ago, inspired me and instilled in me a love of the countryside and the great outdoors – wild places, where the ever changing light offers so much drama and splendour.

This entry would not be complete without including the full text of Psalm 121 – A Song of Ascents. This is the Revised Standard version and so some of the words used do vary from the inscription.

I lift up my eyes to the hills
From where will my help come?
My help comes from the Lord
who made heaven and earth.

He will not let your foot be moved;
he who keeps you will not slumber.
He who keeps Israel
will neither slumber nor sleep.

The Lord is your keeper;
the Lord is your shade at your right hand.
The sun shall not strike you by day,
nor the moon by night.

The Lord will keep you from all evil;
he will keep your life.
The Lord will keep
your going out and your coming in
from this time on and for evermore.

‘I will lift up mine eyes unto the hills’ and try and and do justice through my photography to the beauty that surrounds us.

Lake District 121 – pre-visualisation and post processing techniques

This is the penultimate entry about my 121 workshop with Paul Gallagher in the Lake District. There will be a final post concerned with ‘black and white’ printing to complete the series.

When Paul and I first met in the lounge of The Crowpark Hotel in Keswick, one of the things I said I would like to learn more about was how to pre-visualise the finished photograph before releasing the shutter. To start to think of the photographic workflow as one cohesive process, as opposed to a number of separate steps from seeing, to taking, to processing and finally to print or uploading to the web. This one step followed by another had largely been my way of doing things to date, so I wanted to try and link these stages together and change the way I thought about my approach to photography.

Common sense told me that what happens during each stage must have an impact on the next, and so on down the line. I guessed that by pre-visualising the finished image at the outset, decisions could be made at each stage, as the finished image could already be seen in the mind’s eye. The skill therefore would be to know what might be possible and to take the photograph with this is mind.

For me this idea of thinking ahead was best demonstrated when Paul and I drove through Newlands Valley. I spotted a small group of trees on the horizon and although when we first arrived at this scene the clouds were universally grey, there was some movement in the sky, so we set up our cameras for the shot in the hope that the sky and light would improve…….and after about 20 minutes it did.

Straight out of the camera the RAW image looked like this; not too inspiring you might think but Paul had already talked me through his pre-visualisation of the ‘finished’ shot. I used a 1 or may be 2 stop graduated filter just to balance the exposure values between the sky and the foreground.

20130223-P2230146-2.jpg
1

Back in the digital darkroom and using Lightroom I applied a ‘preset’ to boost the clarity, remove any chromatic aberration and apply a modest amount of sharpening. The next stage was to adjust the saturation and luminance of the blue channel, knowing that when the image was converted to black and white there would be the opportunity to increase the contrast in the sky. Having made these adjustments the RAW image now looked like this.

20130223-P2230146.jpg
2

An improvement on the first image but hardly a photograph to get excited about. The next stage was to import the RAW file into photoshop and then convert the image to monochrome. Using ‘Image’ – ‘Adjustment’ – ‘Black and white’ a window opens which allows you to make adjustments to a range colour channels. Having boosted the saturation and luminance of the blue sky in Lightroom, I further darkened the blue channel to a value of -80. The resulting image is shown below.

20130223-Tress b&w image adj.jpg
3

You might be forgiven for thinking this image is now worse than the colour version and I would probably agree but the next stage really brings the photograph to life. A ‘levels’ adjustment layer was applied and now the image looks like this.

20130223-Trees b&w levels adj.jpg
4

However  some further fine tuning in photoshop was required. A number of ‘curves’ adjustment layers were made to selected areas of the image, before finally sharpening the trees and the foreground, but not the sky. The final adjustment was to crop the photo to balance the composition. Paul is a great believer in cropping to suit the image and not be concerned whether or not the end result conforms to one of the common aspect ratios – i.e. 3×2, 4×3, 5×4 or 1×1. Why be constrained by uniformity if a more custom approach is adopted and enhances each individual image? When I went on the workshop to the Isle of Eigg with Bruce Percy he was a very keen advocate of 5×4 or 1×1, couldn’t stand 3×2, but rarely I think breaks away from the first two aspect ratios. His choice of course but it was good to hear another view. For now I will keep my options open and simply show the finished image.

Trees
Three Trees – the finished photograph
OMD EM5 on a tripod with Panasonic f2.8 35-100mm lens
42mm f13 1/100sec ISO200 

Personally I really like this shot. I love it’s simplicity, the shape and size of the three trees and how their alignment echoes the diagonal line of the clouds. The ability to pre-visualise this shot at the outset is a great skill and is at the very heart of the photographic process. It’s a skill which I doubt is ever mastered but with practice out in the field my knowledge can only grow with time; after all Paul has been practising his art of fine black and white photography for nearly 30 years.  For me though it has opened my eyes to what is possible and that in my view is a great place from which to start.

!function(d,s,id){var js,fjs=d.getElementsByTagName(s)[0];if(!d.getElementById(id)){js=d.createElement(s);js.id=id;js.src=”//platform.twitter.com/widgets.js”;fjs.parentNode.insertBefore(js,fjs);}}(document,”script”,”twitter-wjs”);

Lake District 121 – Post Processing

One of the things I was keen to learn from Paul Gallagher during my recent workshop in The Lake District, was the art, and it is an art, of post processing a RAW file to produce a strong black and white image.

Up until my trip away I had used a combination of Lightroom and Silver Efex Pro2. Rarely would I use Photoshop even though it’s regarded as the ‘daddy’ of all software programs for image editing. Lightroom shares the same Raw converter as Photoshop and is a wonderful tool for your photographic workflow, from importing the images, key-wording, developing and finally to print or uploading to the web. However it does not touch Photoshop when it comes to the fine art of processing a really good black and white image. However I was daunted by the fact that the skills and knowledge to use Photoshop well, take a long time, so I was delighted when Paul demonstrated a few simple techniques which with a little practice I have now been able to apply to the shots I took on the trip.

In the following example the first image on the left is the original RAW file with no adjustments. It’s just as it was when imported from the SD card into Lightroom. The reason for the blue colour cast is down to the fact that this was a 60second long exposure using the Hi-Tech 10 stop ND filter. The second image on the right has simply been converted to black and white and whilst the blue cast has been removed, the image is very flat. The third image is the finished photograph.

20130222-P2220098-2.jpg
RAW file – straight out of the camera

20130222-P2220098.jpg
RAW file with simple black and white conversion
Wastwater Rocks
Wastwater Rocks – the final image

So what simple steps were taken in Photoshop to arrive at this end result? 
Well, firstly in Lightroom I applied a preset which boosted the clarity to a value of 15 and which also applied some sharpening. Amount 50 – Radius 0.5 – Detail 50 and Masking 0. The preset also eliminates any chromatic aberration   created by the lens I used for this shot – the Panasonic f2.8 12 – 35mm. On this occasion CA would not have been visible given the blue colour cast.
Secondly I exported the image from Lightroom into Photoshop CS5. Using ‘image – adjustment’ I then converted the RAW image to black and white. This was followed by a ‘levels’ adjustment layer to move the black and white points on the histogram, to give a full range of tonal values. The ‘mid point’ can also be adjusted if required but was not changed for this particular shot. 
The next stage was to make local adjustments to certain sections or specific areas of the image using the lasso tool to select the area and then apply a curves adjustment layer. The choice of ‘pixel feather’ is critical to make sure that the adjustment only applies to the area required. This is really where a small but subtle change can make quite a difference. I don’t consider myself to be an artist but there is no question that these small changes are the equivalent of applying the finishing brush strokes to a painting. Poor technique in both cases could ruin a good image, the only advantage of Photoshop is that you can ‘step backwards’ or delete a layer. With a painting it would be much more difficult if not impossible to undo. Knowing when to stop is also very important. An image can very quickly look overworked. Once all the adjustments had been made all the layers were ‘flattened’.  (Layers – flatten image).
The last stage was to apply further sharpening using filters – unsharpen mask. Not all areas of an image require or should be sharpened; the sky for example, so a layer mask should used. I created a duplicate layer of the background layer and applied the sharpening to this new layer so the ‘original’ background layer remained unaltered. Once I was happy with the amount of sharpening (easily previewed) the  again I ‘flattened’ both layers. 
Finally I ‘saved as’ a TIFF file and gave the image a title. Once done this new image is saved in the same folder in Lightroom, so it appears alongside the original image. This is a great advantage as I can still go back and carry out another conversion should I wish.

I think there is still a place for Silver Efex Pro2 in my workflow. After all it has been my default plug in for black and white conversions until now. However my eyes have been opened to new ways of working and I am delighted to have learnt some new skills.

Paul talked about other processing techniques and choices that need to be made before post Processing even starts and I will cover some of these key points in my next entry.

!function(d,s,id){var js,fjs=d.getElementsByTagName(s)[0];if(!d.getElementById(id)){js=d.createElement(s);js.id=id;js.src=”//platform.twitter.com/widgets.js”;fjs.parentNode.insertBefore(js,fjs);}}(document,”script”,”twitter-wjs”);